
TL;DR
Placing your rig in a separate room or closet is the most effective way to cut noise. Proper placement of microphones and reflection points, combined with layered absorption and ventilation, makes tiny spaces sound professional. Foam alone won’t solve everything—think about the room’s shape, sealing gaps, and airflow first.
Ever wondered if a closet can double as a decent recording space? The answer is yes — with the right setup. The real secret isn’t just about stuffing foam everywhere; it’s about understanding where sound bounces, how to place your gear, and making sure your rig stays cool. When you treat a closet as a small reflective space first, you can turn it into a surprisingly good vocal booth.
This guide walks you through the best placement strategies, how to dampen reflections, and the one trick that makes or breaks your closet setup — ventilation. Whether you’re recording vocals or running a high-powered AI rig, these tips will help you get cleaner sound and quieter operation without blowing your budget.
Acoustic dampening
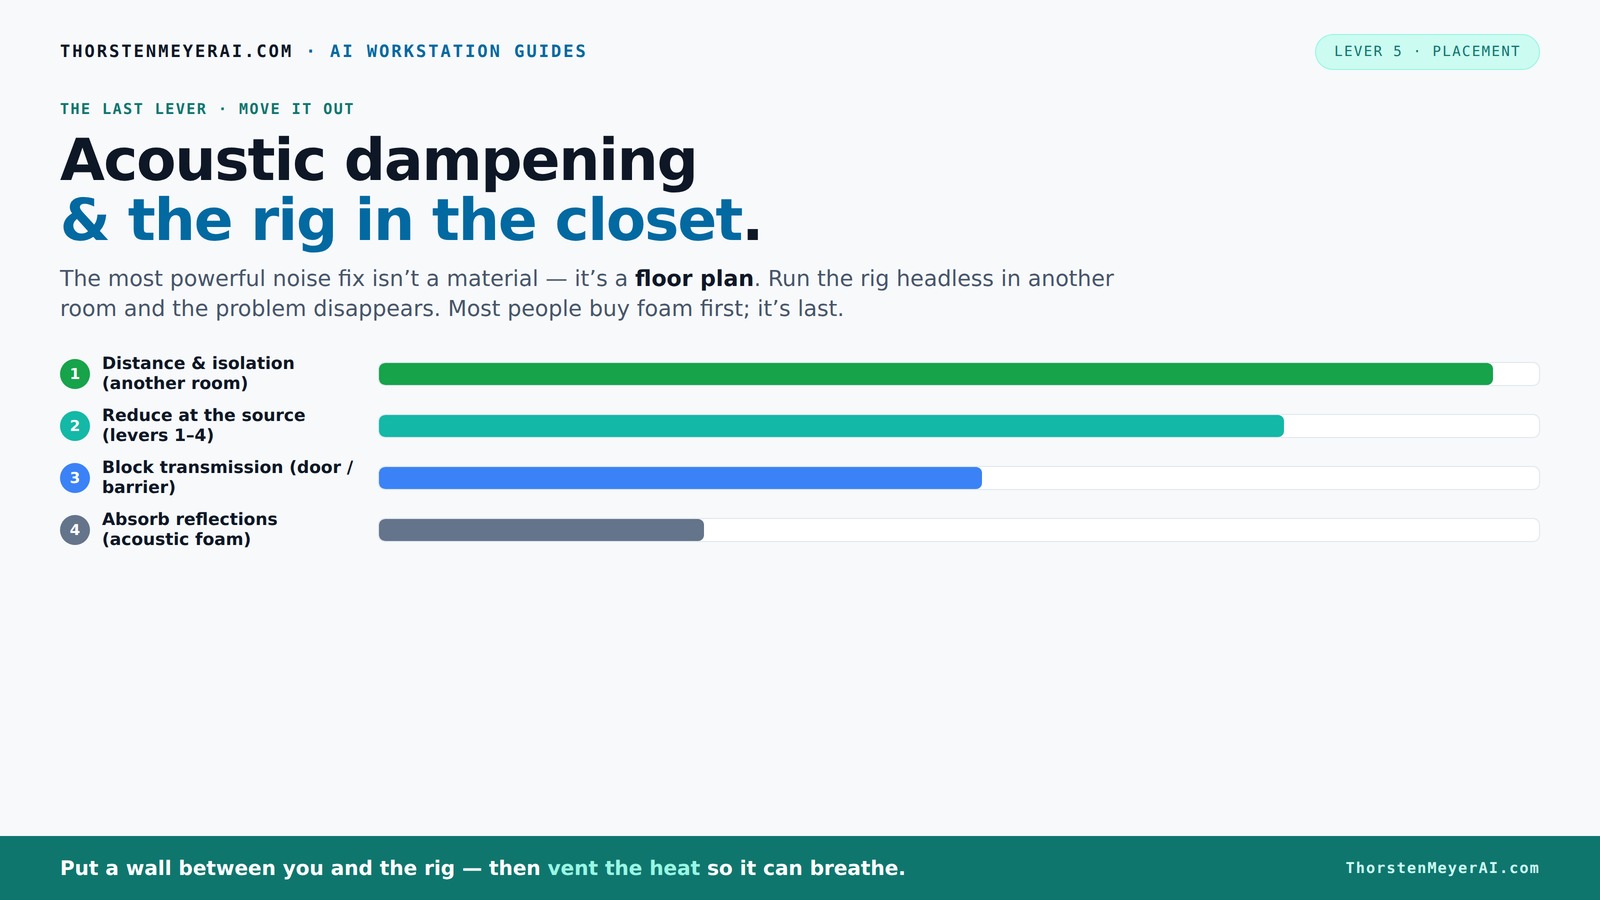
& the rig in the closet.
The most powerful noise fix isn’t a material — it’s a floor plan. A rig you can’t hear because it’s in another room beats any amount of foam. Tap the approaches in Part 1 to see what actually works.
(another room)
(levers 1–4)
(door / barrier)
(acoustic foam)
Contain the noise, not the heat
Key Takeaways
- Prioritize mic placement and reflection points before adding foam or blankets.
- Layer absorption materials—blankets, foam, bass traps—for best sound reduction in small spaces.
- Seal gaps around doors and vents to prevent sound leaks and external noise intrusion.
- Ensure proper ventilation or cooling to prevent heat buildup that causes noise and throttling.
- Treat the room geometry first — covering walls, ceiling, and corners—before relying solely on foam panels.

Focusound 52 Pack Acoustic Foam Panels 1" x 12" x 12" Sound Proof Foam Panles Soundproofing Noise Cancelling Wedge Panels for Home Office Recoding Studio with 300PCS Double-Side Adhesive
- Soundproofing Design: Triangular grooves for noise absorption
- Includes Adhesive Tape: 300pcs double-sided adhesive for easy installation
- Easy Shape Recovery: Soak in water to restore shape
As an affiliate, we earn on qualifying purchases.
As an affiliate, we earn on qualifying purchases.
Why Placement Comes Before Absorption in Small Spaces
Where you put your mic and speakers matters more than any foam panel you slap on the wall. In tiny closets, sound bounces quickly between surfaces, creating a boxy, echoey quality. The first step? Position your mic and voice/monitor setup carefully. Once you find the sweet spot, treat the main reflection points—like the wall behind the mic and side walls—before adding foam or blankets.
Imagine you’re recording vocals. You’d want the mic to be as far from the walls as possible, or at least angled so sound doesn’t bounce straight back. Then, treat the wall behind the mic with absorption—hanging a blanket or foam panel at ear level. This order is crucial because it prevents reflections from bouncing back into your mic, giving you cleaner recordings.
The reason this matters is that proper placement reduces the initial sound reflections that cause coloration and echo. If your microphone is too close to reflective surfaces, your recordings will pick up unwanted room resonances, making your audio sound muddy or boxy. By understanding the path sound takes, you can strategically position your gear to minimize these issues, leading to clearer, more professional results.
How Small Rooms Turn Sound into a Box — And How to Fix It
Small, parallel surfaces in a closet act like a speaker cabinet — bouncing sound back and forth, especially at low frequencies. This creates that annoying "boxy" sound that ruins vocal recordings or makes your AI rigs sound louder than they actually are. The fix? Layered absorption on walls, ceiling, and corners, plus strategic placement of your gear. For more detailed strategies, see this guide on room treatment.
For example, hanging thick fiberglass panels on walls and ceiling cuts reflections. Placing a rug or carpet on the floor absorbs bouncing sound from the ground. Bass traps in the corners help tame low-end build-up. The goal? Break the sound's echo loop and keep it from becoming a muddy mess.
Understanding the physics behind this is key: parallel surfaces reflect sound waves directly back and forth, reinforcing certain frequencies and creating standing waves. Learn more about acoustic treatment at this resource. These standing waves cause uneven frequency response and muddiness. By introducing irregularities—like angled panels or irregular surfaces—you disrupt these reflections, reducing resonance peaks and dips. Strategically placing bass traps in corners absorbs low-frequency build-up, which is often the hardest to control but most critical for a balanced sound. Recognizing these acoustic issues and their implications helps you design a treatment plan that tackles the root causes, not just surface echoes, resulting in a more natural, transparent sound.
Layering Absorption: The Best Approach for Tiny Spaces
In a closet, the goal isn’t just to block sound — it’s to absorb it. Use a mix of blankets, foam panels, and bass traps. Cover at least 20-30% of the wall area for good echo reduction, but more is better in tiny rooms. Hanging blankets with an air gap, or installing thick foam, can drastically improve sound quality.
For instance, a DIY setup might involve hanging moving blankets a few inches from the wall, creating a buffer that dampens reflections. Add foam panels at reflection points—like the side walls and ceiling—and install bass traps in the corners. The more layers, the cleaner your sound.
The tradeoff here is that more absorption can make the room overly dead-sounding if overdone, reducing liveliness and making the space feel unnatural. For tips on balancing sound, visit WoodnBits. Finding the right balance between absorption and natural sound is key. Layering multiple materials—such as blankets, foam, and bass traps—creates a more complex, effective acoustic environment by targeting different frequencies and reflection points. This layered approach ensures that you’re not just reducing echoes superficially but addressing the underlying acoustic issues for a richer, more accurate sound profile.
Sealing the Door and Gaps — Don’t Let Sound Escape
The door is often the weakest link in a closet studio. Even tiny cracks or gaps let sound leak out and ruin your effort. Use weatherstripping, door seals, or thick blankets draped over the door to block sound escape. Sealing cracks around hinges and the frame helps keep noise inside and outside interference at bay. Find more about effective room sealing at Grace for Life Designs.
Imagine sealing the door with a heavy blanket or acoustic curtain. It’s an easy, cheap fix that makes a huge difference. This simple step improves your room’s soundproofing, especially if you’re recording vocals or trying to keep external noise out.
Understanding the tradeoffs, sealing gaps isn’t just about reducing noise leakage; it also prevents external noise from entering, which is vital if your environment is noisy. However, over-sealing without ventilation can cause heat buildup, which is problematic for both your gear and comfort. The key is to find a balance—seal gaps effectively but include ventilation solutions to manage airflow and temperature. Proper sealing enhances sound isolation but should be complemented with ventilation to prevent heat and humidity issues, ensuring your space remains both quiet and safe for your equipment.
Ventilation and Heat — The Hidden Challenge of a Closet Rig
Placing a powerful, heat-generating rig in a closet is a recipe for overheating. Trapped heat can throttle your GPU and cause fans to roar. To keep your system cool, add active ventilation—like a small exhaust fan or ducted airflow—plus passive vents. Without proper airflow, your rig will overheat and noise will spike. For more on cooling solutions, see Solar Power Savvy.
For example, installing a quiet exhaust fan at the top of the closet, with a vent in the door, allows hot air to escape. Pair this with a ducted intake to bring in cool air. A purpose-built soundproof cabinet with temperature control can do both — keep your rig cool and quiet.
Understanding the implications of heat buildup is critical: excessive heat not only risks damaging your equipment but also causes fans to run at higher speeds, increasing noise levels. Proper ventilation strategies—such as ducted intake and exhaust, or quiet fans—are essential to maintain a stable temperature. Consider the tradeoff between soundproofing and airflow; overly sealed spaces without ventilation can trap heat, defeating the purpose of a quiet environment. Investing in a balanced cooling system ensures your rig operates efficiently, prolongs hardware life, and keeps noise levels manageable, creating a healthier, more reliable workspace.
Putting It All Together: Your Step-by-Step Closet Studio Setup
- Position your mic and voice/monitor setup first. Find the sweet spot.
- Treat reflection points: wall behind mic, side walls, ceiling.
- Seal the door with weatherstripping or blankets.
- Add bass traps in corners for low-end control.
- Layer blankets and foam panels for absorption.
- Install ventilation if your rig runs hot.
Following this order ensures you minimize reflections, control low frequencies, and keep your system cool. It’s a balanced approach that turns a tiny closet into a surprisingly good workspace.
Frequently Asked Questions
Can a closet really work as a recording booth?
Yes, especially for vocals or voiceovers. While it won’t fully isolate sound, proper treatment and placement can drastically reduce reflections and echo, making your recordings clearer and more professional.
What should I treat first: walls, ceiling, corners, or door?
Start with mic placement and reflection points. Then, seal the door and gaps. Finish with bass traps in corners to control low-end buildup. Layering treatment in this order gives the best results.
Do acoustic foam panels soundproof a closet?
No, foam absorbs echo and reduces reflections but doesn’t block sound from escaping. For true soundproofing, you need barriers and sealing, not just foam.
How thick should acoustic treatment be?
In small closets, 2-inch panels are usually enough for general absorption. Thicker panels—up to 4 inches—are better if you have low-frequency issues or larger coverage areas.
Do I need bass traps in a closet?
Yes, if your space has noticeable low-end buildup or parallel walls. Bass traps in corners help tame muddy, boomy low frequencies for a cleaner sound.
Conclusion
In a tiny closet, the secret to a quiet, professional sound isn’t just about adding foam. It’s about smart placement, layering absorption, sealing gaps, and managing heat. With a little effort, your closet can become a surprisingly effective studio—quiet, cool, and ready for prime time.
Think of your closet as a small, reflective space that can be tamed. Focus on the basics: position, treatment, and airflow. The result? Better sound and less noise spilling into your workspace. Your perfect closet booth is closer than you think—just start layering smarter, not harder.